


Recent Recipes
Moroccan Sweet Potato, Carrot & Chickpea Soup
Comments (4) | Wednesday, April 29, 2009
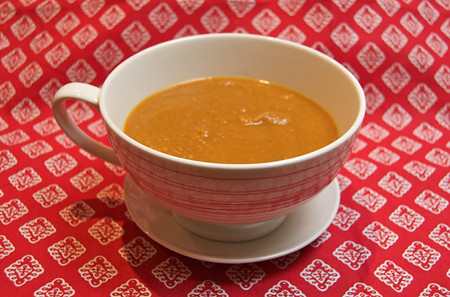
I don't know about the rest of you, but Melbourne has suddenly been hit with cold, miserable weather. The type where all you want to do is stay in bed with the electric blanket on and watch dvds. However, it is also good weather for soup! This mug may look normal size but I assure you it is massive.
This warm, tasty soup will be my lunch for the rest of the week with some nice grainy toasted bread. Just the thing I'll need when I'm at work, especially because I won't have to wonder down the street to find lunch in the freezing cold!
The spices used provide a nice middle eastern flavour, and the kick of chilli will definitely help to warm me up. I have a feeling I will be making this soup quite a few times this winter!
Moroccan Sweet Potato, Carrot & Chickpea Soup
Annette Forrest (www.taste.com.au)
2 tablespoons olive oil
1 large brown onion, roughly chopped
2 garlic cloves, crushed
1 teaspoon ground coriander
2 teaspoons ground cumin
1/4 teaspoon chilli powder
600g orange sweet potato, peeled, diced
500g carrots, peeled, sliced
6 cups reduced-salt chicken stock
300g can chickpeas, drained, rinsed
1/2 small lemon, juiced
Turkish bread croutons (see note), to serve
1. Heat oil in a large saucepan over medium-high heat. Add onion and garlic. Cook, stirring often, for 3 minutes. Stir in coriander, cumin and chilli powder. Cook, stirring, for 1 minute. Add sweet potato and carrot. Cook, stirring often, for 5 minutes. Add stock. Cover. Bring to the boil. Reduce heat to medium-low and simmer, stirring occasionally, for 20 minutes.
2. Add chickpeas to soup and simmer, covered, for 10 minutes or until chickpeas are tender.
3. Blend soup, in batches, until smooth. Return to saucepan over medium-low heat. Season with salt and pepper. Stir in 1 tablespoon lemon juice. Heat, stirring, until hot (do not boil). Ladle into bowls. Top with croutons. Sprinkle with pepper.
Serves 4.
 Voila! Bon Appétit!
Read More......
Eating Out: SUD Food & Wine
Comments (2) | Monday, April 27, 2009
Last week my friend Iron Chef David got admitted as a lawyer in the Supreme Court of Victoria. I've known David for pretty much my whole life, so it was an honour to go along and see one of his dreams come true.
To celebrate, his mentor (a partner from the law firm) took us all out for lunch. We went to a place called Sud.
Naturally, we started with some sparkling wine to celebrate. Our waiter offered to do a mixed selection of entrees for us which consisted of a lovely tomato and buffalo mozzarella salad, octopus and kifler potato salad, quail on a bed of cous cous with a pomegranate molasses and prosciutto from Parma. Sorry there are no photos of these, I didn't want to be whipping out my camera all the time on David's special day! But I would have to say, prosciutto from Parma was definitely my favorite. I've never had prosciutto as nice as that one.
It was a nice cosy restaurant that offers fine food and wine. There isn't the traditional "flippy" menu as our waiter explained, but just a board on the wall with all the dishes that were on offer. Whilst I did like this idea, the menu was 99% if not 100% written in Italian which was a bit hard to decipher. Our Italian waiter explained all the items about 2 or 3 times in his thick Italian accent but my poor friend Bec didn't understand him. Luckily when we were just about to order, a lady came over and explained everything in her Australian accent, which we could all understand clearly!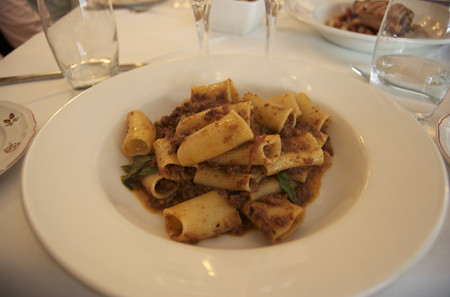 I went for the Rigattoni Bologna, which was pretty much just spaghetti bolognese. It was almost like an osso bucco sauce with lots of fresh basil. Simply delicious! I generally judge an Italian restaurant by how well they can do a pasta, and this place passed with flying colours. Plenty of minced pork, and a very filling serve.
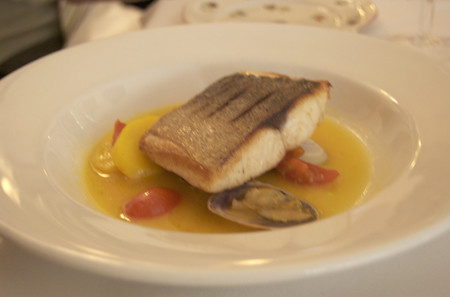 My friend Bec got the kingfish. This came with fresh muscles and calms, she really enjoyed it. It was light and cooked to perfection, and it looked amazing too!
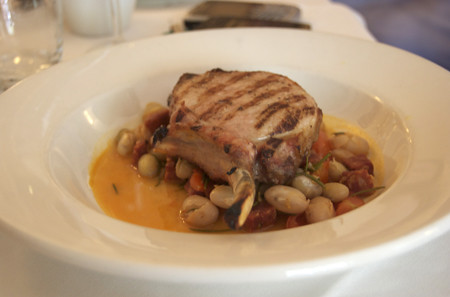 Annamarie, another lunch guest from the firm ordered the pork cutlet, which was on a bed of cannellini beans and other delicious ingredients. The presentation is simple but so appetising. I wouldn't normally order something like this but it just looks divine!
The best thing about this place was the fresh bread and olive oil that kept getting topped up throughout the lunch. They must make the bread on site as it is still warm, incredibly fresh and most of all, mouth watering!
So thank you again to David's mentor for this scrumptious lunch! And congratulations again to David, the lawyer to end all lawyers!
View Larger Map

Read More......
Eating Out: Kanteen
Comments (0) | Friday, April 24, 2009
On Easter Monday, Nerdy Rob, his friend and I went on a bike ride along the Yarra River for something a bit different. We had parked the car near this place that I've been wanting to visit for ages since seeing it on the television.
Excuse the poor photos, they are from my iPhone and not the usual camera.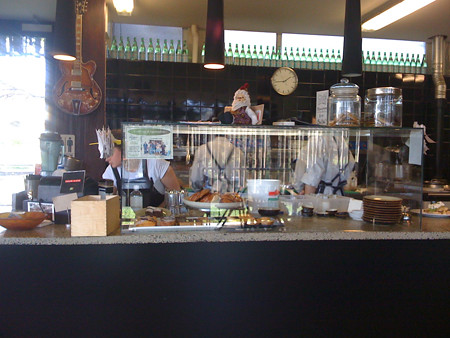 Kanteen is a very casual laid back sort of place you'd go to on the weekend with your newpapers and relax in the sun. You might be seated on a table with people you don't know, but it doesn't matter because it's just that sort of place.
They serve breakfast till 3pm, so even if you had a big one the night before, you can still get your bacon and eggs here pretty late.
I had the peppered chicken pide:
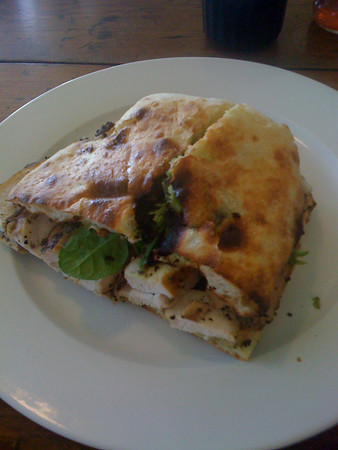 Peppered Chicken Pidé - $10.50
w/ pesto mayonnaise, avocado, roasted capsicum, tomato, cheese & spinach
Rob's friend on the other hand was short changed with what would be the world's smallest croissant. It doesn't look small here but I assure you it was about the size of your palm.
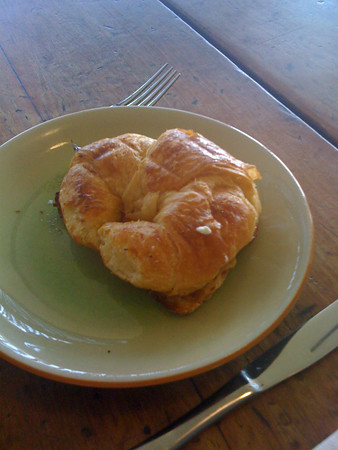 croissant - w/ jam lady jams or ham & cheese 4.5 | 6.0
I'm guessing the poor guy was still very hungry at the end of it, and was trying to offer him part of my pide so he could not go home hungry!
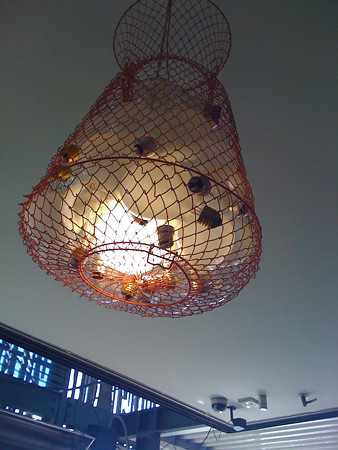 This is just a cool light fitting we had above our table.
Service was pretty good, and the fact that you can see straight into the kitchen does have a nice appeal to it. The atmosphere is probably the best thing about the place. Located right on the Yarra River, it is a great brunch place to chill-ax at.
 Kanteen
150 Alexandra Avenue
South Yarra VIC 3141
Web: http://www.kanteen.net/

Read More......
High Tea at the Park Hyatt, Melbourne
Comments (0) | Sunday, April 19, 2009
I was very lucky today! My darling friend Iron Chef Alana took me out for a pre-birthday, birthday high tea at the Park Hyatt in Melbourne. I was quite excited as this was my first ever high tea, and I was glad to have shared it with Alana.
We started off with a glass of bubbles! I can't remember what the waitress said it was, but it was a really nice drop. (Update; Alana tells me it was Hardys Brut Reserve). But as you can see, there was quite a selection of wine available: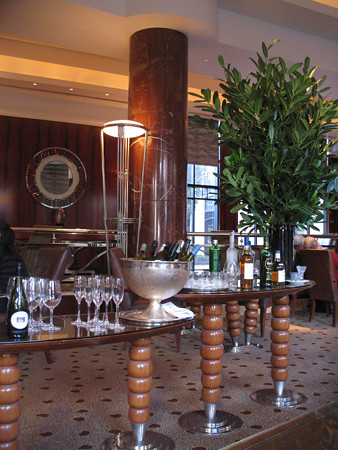 Set in the tea rooms of the Park Hyatt hotel, it was a gorgeous location next to main court yard of the hotel, with lovely piano music playing in the background.
Our lovely caddy arrived full of goodies: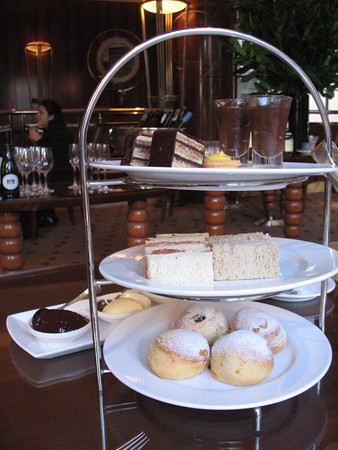 From the bottom, we have 2 plain scones, 2 fruit scones.
Middle tier: 2 egg sandwiches, 2 salmon & cucumber sandwiches, 2 turkey & cranberry sauce sandwiches (my favorite), and ham & cheese sandwiches. The top tier had 2 slices of chocolate Opera cake, 2 lemon tarts, 2 chocolate mousses and 2 (we think) green tea sponge with mango topping cake.
The Opera cake had a coffee cream in some of the layers, and it was rich and delicious. The chocolate mousse, I didn't finish! Me... the chocolaholic, didn't finish the chocolate mousse!! I just had a little taste but it was so thick and rich, I possibly could have got diabetes if I ate the whole thing! I was getting pretty full by the time I tried the chocolate mousse.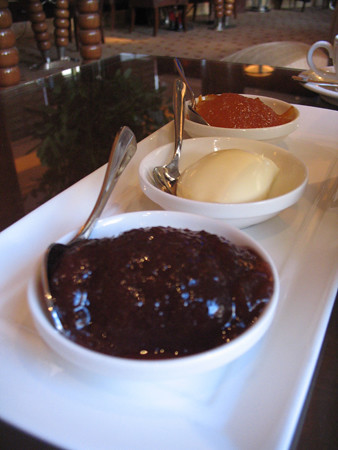 The scones were delicious, which was fantastic as we were looking forward to eating scones more than anything else. They were dusted with icing sugar which was really a pleasant surprise, usually I've only had them dusted in flour.
We received jam, cream and marmalade to go with them. A lovely place for a lovely afternoon tea.
Once again, thank you to Iron Chef Alana for this delicious birthday present! I couldn't have asked for more!
Tea Lounge @ The Park Hyatt
Phone: (03) 9224 1234
Web: http://www.melbourne.park.hyatt.com/hyatt/hotels/entertainment/lounges/index.jsp
Read More......
Orange & Coconut Cake
Comments (2) | Thursday, April 16, 2009
More Easter baking! This cake is so incredibly easy to make, you could make it anytime of year, just leave off the Easter eggs. It is such a moist cake. I like the idea of using orange juice instead of milk, maybe that has something to do with why it was so moist.
Orange & Coconut Cake
Kate Murdoch
1 cup caster sugar
125g unsalted butter, softened
3 teaspoons finely grated orange rind
4 eggs
1 cup (160g) self-raising flour, sifted
1 3/4 cups (150g) desiccated coconut
2 tablespoons freshly squeezed orange juice
Easter eggs and icing sugar, to serve
1. Preheat oven to 160°C. Place sugar, butter and orange rind in a large bowl, and beat with electric beaters for 4 minutes until light and creamy. Add eggs, one at a time, beating well between additions.
2. Fold flour and coconut through mixture, along with orange juice. Spoon mixture into a 22cm-round cake pan greased and lined with baking paper. Cook for 50 minutes or until cooked through when tested with a skewer.
3. Allow to cool, then decorate with Easter eggs and a dusting of icing sugar.
Read More......
Chocolate-Orange Marble Cake
Comments (3) | Wednesday, April 15, 2009
I wanted to make dessert for Easter Sunday lunch with the family. Being Easter it had to involve chocolate didn't it? I tried the chocolate orange marble cake from the latest Donna Hay magazine. I then spruced it up with some little Easter eggs and a very cute little chicken.
I didn't do the marble effect very well on this one, it looks more like a top deck cake than anything but it was fantastic. Chocolate and orange is always a good combination and this didn't disappoint. The chocolate fudge sauce is definitely a must when doing this cake, so don't leave it out! I just need to get some fancy Bundt tins....hmmm my birthday is coming up *wink wink*!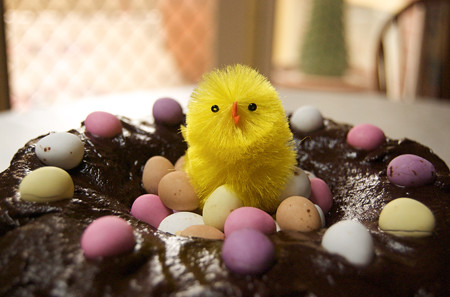
Chocolate-Orange Marble Cake
Donna Hay
1 1/3 cups (330ml) milk
2 cups (440g) caster sugar
1 teaspoon vanilla extract
250g butter, melted
1 1/2 cups (225g) plain flour, sifted
1/4 cup (40g) self-raising flour, sifted
2 eggs
1/4 cup (20g) cocoa, sifted
150g dark chocolate, melted
1 tablespoon finely grated orange rind
1-2 drops orange food colouring
chocolate fudge sauce
1/3 cup (80ml) single (pouring) cream
200g dark chocolate, chopped
1. Preheat oven to 160ºC (320ºF). Place the milk, sugar and vanilla in a bowl and whisk to combine. Add butter and whisk to combine.
2. Add flours and eggs and whisk until smooth.
3. Divide mixture into 2 bowls. Add the cocoa and chocolate to one and whilst until smooth. Add the orange rind and food colouring to the other and whisk until smooth.
4. Pour chocolate mixture into a well greased 8 cup-capacity (2 litre) Bundt tin. Drop spoonfuls of the orange mixture onto the chocolate and gently swirl with a butter knife to create a marble effect.
5. Bake for 1 hour 10 minutes or until cooked when tested with a skewer. Cool in tin for 10 minutes. Turn onto a wire rack t cool completely.
6. To make the chocolate fudge sauce, place the cream and chocolate in a saucepan over a low heat and cook, stirring, until melted and smooth. Pour over the cake to serve.
Serves 8-10.
 Voila! Bon Appétit!
Read More......
Eating Out: Nights of Kabul
Comments (0) | Tuesday, April 14, 2009
Nights of Kabul is located amongst the shops around the shopping centre in Oakleigh. We were first to arrive at 6:30pm. A steady influx of people flowed through, during our time there.
We started with some dips and naan bread which were all delicious. Then we went onto mains:
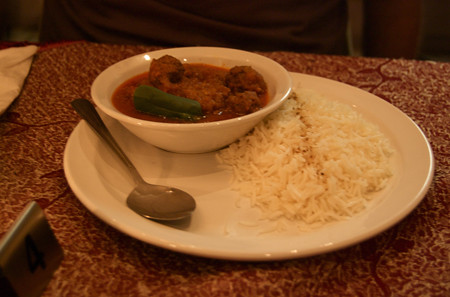 Kofta Korma - $16.50
Meatballs mixed in mild spices & served with rice.
Delicious, melt in your mouth meatballs with a lovely mild sauce had Nerdy Rob pleased and full for the rest of the night. Served with rice, a lovely comfort, wintery meal.
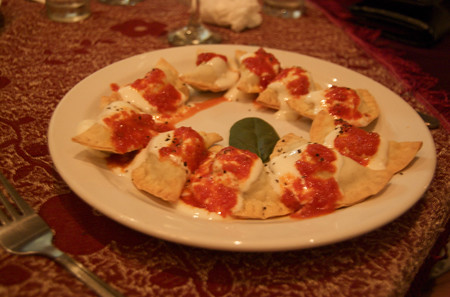 Aashak - $16.50
Traditional Afghan pastries, filled with fresh leeks and mild spices, topped with a special tomato and yoghurt sauce.
David enjoyed these vegetarian pastries. I had the meat version of these which you can see below. The vegetarian version is crunchy pastry, where as the meat version is more of a steamed dumpling. We both agreed that the yoghurt and tomato sauce was just an amazing, refreshing combination.
I'm really looking forward to having these again sometime soon!
 Mantu - $16.50
Traditional Afghan pastries, specially wrapped and steamed filled with mince lamb, onion and mild spices. Topped with a special sauce.
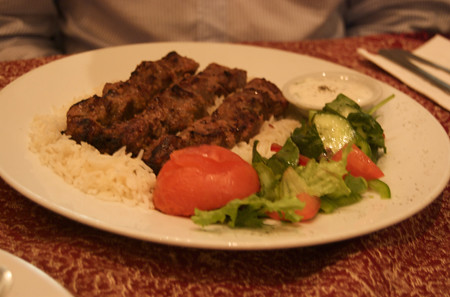 Lamb Tika - $17.50
Succulent cube cuts of lamb, marinated in mild spices and freshly grilled over charcoal.
Everything was delicious. Service was good, our waiters were great. The ambiance is a little flat. I was getting very sick of the Afghan music playing in the background very quickly, but good friends and conversation helped to drown it out! I can't wait to go back for those dumplings!

Read More......
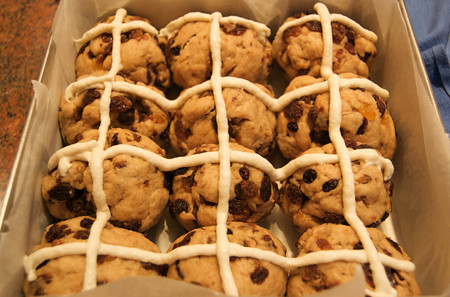
Hot Cross Truffles
Comments (2) | Monday, April 13, 2009
Well Easter is pretty much over! Hope you all had a great long weekend and seriously over indulged like I did. I think I ate more than what I would at Christmas. Well definitely more chocolate that's for sure.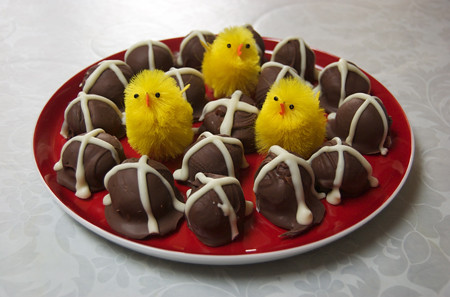 My hot cross buns got lots of attention, and well why not make hot cross truffles that taste just as good?
They contain mixed fruit and the same spices as I used in my hot cross buns, but coated in lashing of chocolate and cream... yum! They are deliciously creamy on the inside, and the mixed fruit makes these little yummies a little bit healthy! haha!
Hot Cross Truffles
Gemma Purcell
200g milk chocolate, coarsely chopped
80ml (1/3 cup) thickened cream
60g (1/3 cup) dried mixed fruit
1/2 tsp ground mixed spice
1/4 tsp ground cinnamon
1 x 375g pkt milk chocolate melts
150g white chocolate melts
1. Place milk chocolate and cream in a heatproof bowl over a medium saucepan half-filled with simmering water (make sure the bowl doesn't touch the water). Use a metal spoon to stir until chocolate melts and the mixture is smooth.
2. Remove any whole cherries from the mixed fruit. Add the mixed fruit, mixed spice and cinnamon to chocolate mixture and stir to combine. Cover and place in the fridge for 3 hours or until firm.
3. Line a baking tray with non-stick baking paper. Use your hands to roll tablespoonfuls of mixture into balls. Place on the lined tray. Place in the fridge for 30 minutes or until firm.
4. Place the milk chocolate melts in a heatproof bowl over a saucepan of simmering water (make sure the bowl doesn't touch the water). Use a metal spoon to stir until chocolate melts and is smooth. Use a truffle dipper or a fork to dip 1 truffle into the melted chocolate to evenly coat. Remove truffle, tapping the dipper handle gently on the edge of the bowl to shake off excess chocolate. Place on the lined tray. Set aside for 10 minutes to set.
5. Place white chocolate melts in a heatproof bowl over a saucepan of simmering water (make sure the bowl doesn't touch the water). Use a metal spoon to stir until chocolate melts and is smooth. Transfer to a piping bag fitted with a 4mm plain nozzle. Pipe a cross on the top of each truffle. Set aside for 10 minutes to set.
 Voila! Bon Appétit!
Read More......
Hot Cross Buns
Comments (11) | Tuesday, April 7, 2009
My first batch of hot cross buns ever...and they were a success!
I was going to do Nigella Lawson's recipe, but hers looked all flat and lifeless. And every other recipe I read, looked like way too much work! I was pretty sure Donna Hay had a recipe and I'm glad she did. Like most of her recipes, this one was easy.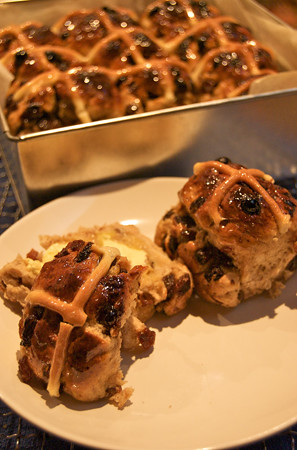 I felt that Donna Hay's recipe didn't include enough mixed fruit so I added in LOTS more. I have made alterations in the recipe to about 2.5 cups of mixed fruit, but you can add more or less depending on how fruity you like your buns.
I feared they were going to be as hard as rocks but they weren't. They were surprisingly soft and delicious! The spices were right, the flavour was there, and I'm so glad they were a success. I might try choc chip ones next time!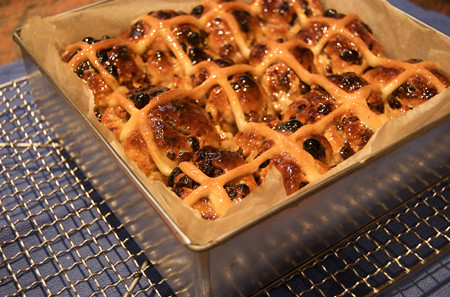
Hot Cross Buns
Donna Hay, alterations by Iron Chef Shellie
2 tablespoons dried yeast*
¼ cup (55g) caster (superfine) sugar
1½ cups (375ml) warm milk
4¼ cups (635g) plain (all-purpose) flour
2 teaspoons mixed spice
2 teaspoons ground cinnamon
50g butter, melted
1 egg
¼ cup (55g) caster (superfine) sugar, extra
2½ cups mixed fruit
Crosses
½ cup (75g) plain (all-purpose) flour
⅓ cup (80ml) water
Glaze
2 teaspoons sugar
1 teaspoon powdered gelatine
¼ cup (60ml) water
1. Combine the yeast, sugar and milk in a bowl. Set aside for 5-10 minutes or until bubbles form on the surface.
2. Combine the flour, mixed spice, cinnamon, butter, egg, extra sugar, sultanas, mixed peel and yeast mixture in a large bowl. Mix with a butter knife until a sticky dough forms. Knead on a lightly floured surface for 5–10 minutes or until it feels smooth and elastic when pressed. Place in an oiled bowl, cover with a tea towel and stand in a warm place for 30–40 minutes or until doubled in size.
3. Lightly knead the dough again, divide into 12 pieces and roll into balls. Place in a 23cm-square cake tin lined with non-stick baking paper. Cover with a clean tea towel and set aside in a warm place for 25–30 minutes or until doubled in size.
 4. Preheat oven to 200ºC (390ºF). To make the crosses, combine the flour and water to make a smooth paste. Place in a piping bag** and pipe crosses onto the buns. Bake for 30–35 minutes or until well browned and springy to touch.
5. To make the glaze, combine the sugar, gelatine and water in a saucepan over medium heat and stir for 2 minutes or until dissolved. Brush warm buns with the glaze and serve with butter.
* You will need this amount of yeast because of the amount of sugar in the recipe.
** To make a piping bag, fill a ziplock bag with the cross mixture and snip off one corner.
Makes 12.
 Voila! Bon Appétit!
Read More......
Caramel Easter-Egg Muffins
Comments (2) | Saturday, April 4, 2009
It's that time of year again, my favorite, Easter! Chocolate to celebrate? I dunno who thought of that but I LOVE that idea!
I was going to give hot cross buns a go but my aunty dropped around a dozen and mum bought some so I thought I'd leave that idea for another day. I didn't buy enough caramel easter eggs, so 2 muffins were left with some random chocolate I found in the pantry.
These are good even if they aren't warm. They are best after baking as the chocolate is still all soft and gooey. A nice treat for your Easter breakfast!
Caramel Easter-Egg Muffins
Taste.com.au
2 1/4 cups self-raising flour
2/3 cup caster sugar
125g butter, melted, cooled
3/4 cup milk
2 eggs
1 teaspoon vanilla essence
12 small caramel-filled Easter eggs*
1. Preheat oven to 180°C. Line a 12 x 1/3-cup capacity muffin pan with paper cases.
2. Sift flour into a large bowl. Stir in sugar. Whisk butter, milk, eggs and vanilla essence together.
3. Add butter mixture to dry ingredients. Use a wooden spoon to mix until just combined (don't over-mix or your muffins will be tough). Spoon batter into cases so each is one-third full. Place an unwrapped Easter egg into the middle of each muffin. Spoon over remaining muffin batter. 4. Bake muffins for 18 to 20 minutes, or until light golden and cooked through. Stand in pan for 10 minutes before turning onto a wire rack to cool completely.
Hint: Make sure you don't eat muffins while hot as the caramel inside the eggs will be very hot. * When Easter eggs are not available, use Rolo chocolates or pieces of caramel-filled chocolate.
 Voila! Bon Appétit!
Read More......
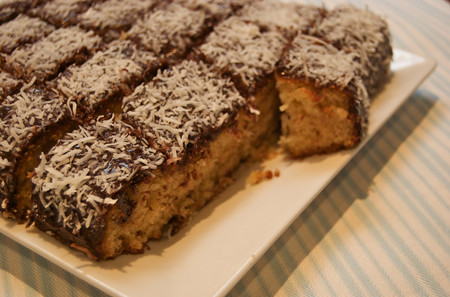
Lamington Cake
Comments (0) | Friday, April 3, 2009
Last week I promised my work mates some baked goods on Friday. I was keen to do something with chocolate (oh how unlike me right?), but I wanted a recipe where I didn't have to go and buy lots of ingredients. I've been going through my massive magazine collection and found this cake that looked yumo!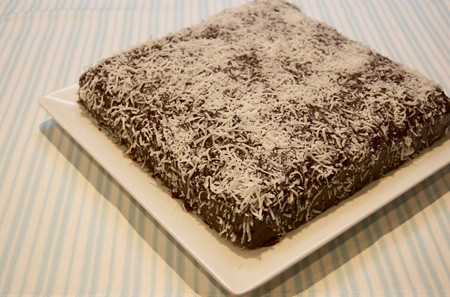 Typical me doesn't read instructions all that well and added ALL the vanilla into the cake and wondered why it was asking to put more vanilla in the icing! So folks, if you are going to make this one, pay attention as to how much vanilla goes into the cake!
It was yum! Whilst for some reason when I took my first taste I was a bit upset as it wasn't as soft and spongy like a lamington, I had to remind myself it was actually a "cake". Everyone who got a slice loved it.
If you want, you can slice it in half and put in cream and jam.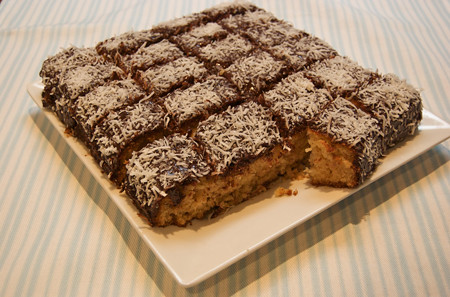 Lamington Cake
Valli Little & Amanda Biffin
190g unsalted butter, softened
1 cup (220g) caster sugar
2 teaspoon vanilla bean pasta or vanilla extract
3 eggs
2 1/3 cups (350g) self-raising flour, sifted
1 cup (250ml) milk
220g dark chocolate
1 cup (25oml) thickened cream
1 cup desiccated or shredded coconut
1. Preheat the oven to 170°C. Grease and line a 20cm square cake pan.
2. Process butter and sugar in a processor for 2 minutes until light. Add 1 teaspoon vanilla. Add eggs one at a time, pulsing after each until just combined.
3. In 3 alternating batches, add flour and milk, pulsing to combine. Pour into pan and bake for 55-60 minutes until skewer inserted in centre comes out clean. Cool for 5 minutes, then turn onto a rack to cool completely.
4. Meanwhile, stir chocolate, cream and remaining vanilla in a heatproof bowl over simmering water until smooth (don't let the bowl touch the water). Chill for 20 minutes to thicken. Spread this icing over the cake, then sprinkle top and sides with coconut.
Serves 8-10.
 Voila! Bon Appétit!
Read More......
The Movie I Most Want To See This Year...
Comments (0) | Thursday, April 2, 2009
It has the cutest name "Cloudy with a Chance of Meatballs".
I go weak at the knees just thinking about meatballs! It looks full of food, and I'm not sure if I should take along my camera and take photos to blog about it later!
Read More......
Eggplant and Beef Bolognese
Comments (0) |
I LOVE my pasta. Hence why my waistline isn't what I'd like it to be, but as my aunty once said "I'm here for a good time, not a long time", so I'll enjoy my pasta and then go work some of it off at the gym.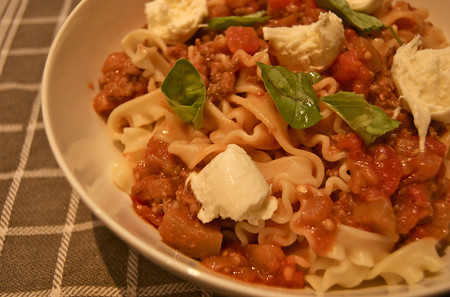 So it's no surprise I wanted to try this recipe from the latest Donna Hay magazine.
I haven't used eggplant before believe it or not! Was never really a fan, but since starting cooking, I've been eager to try new flavours and all the things I've been missing out on!
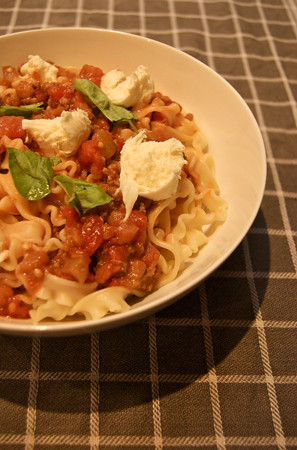
I couldn't find any pappardelle pasta, so I settled on curly fettuccine. It almost looks like squid instead of pasta!
So I peeled the eggplant and was starting to chop it up when my dad comes over and goes "What's THAT?!" I couldn't help but laugh because I also thought it looked weird when it was naked, almost like a melon or something!
The sauce didn't taste all that fantastic, so I seasoned it with salt, pepper and sugar. It was still a bit runny and didn't look that great to I added in a tub of tomato paste and BAM! It looked much better and tasted amazing!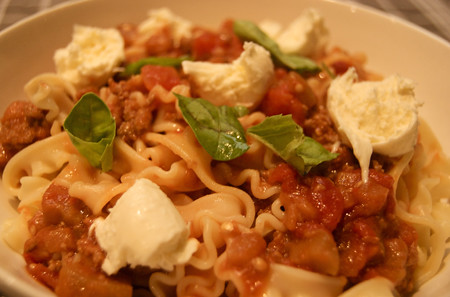 The torn bocconcini and basil add a lovely finishing touch. Better than your average bolognese. Luckily there were leftovers so I can enjoy it again today!
Eggplant and Beef Bolognese
Donna Hay with alterations by Iron Chef Shellie
400g pappardelle pasta, or fettuccine
2 tablespoons olive oil
1 eggplant, chopped
2 cloves garlic, crushed
500g beef mince
2 x 400g cans chopped tomatoes
1 tub tomato paste
1/2 cup basil leaves
240g bocconcini, torn
1. Cook the pasta as per instructions on the packet. Drain and keep warm.
2. Heat the oil in a large frying pan over high heat. Add the eggplant and garlic and cook for 2-3 minutes or until golden.
3. Add the beef and cook, breaking up any lumps with a wooden spoon, for 5 minutes or until browned. Add the tomato and cook for 5 minutes or until thickened. Add 1 tub of tomato paste and stir through.
4. Add the pasta and toss to combine. Top with basil and bocconcini to serve.
Serves 4.
 Voila! Bon Appétit!
Read More......
Lemon & Hazelnut Biscuits
Comments (2) | Wednesday, April 1, 2009
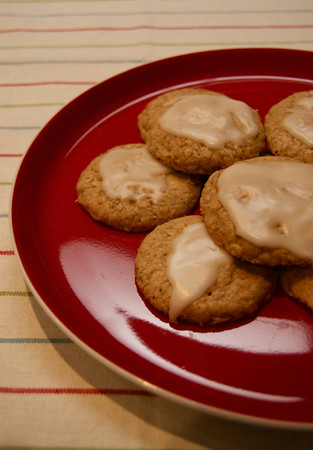
I've been wanting to try this recipe for a long time now. With some sad looking lemons in the fruit bowl, today was the day!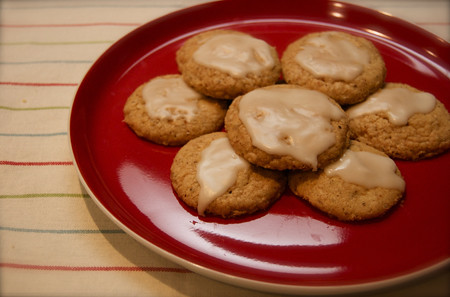
I didn't have any candied lemon to decorate the top with, but I don't think it is that necessary until you are perhaps making these for a present.
Very simple to make, and the one of the most amazing flavour combinations! I tend to love anything with hazelnuts since I grew up on Nutella. Then lemon icing tang adds a lovely finishing touch. I am just about to enjoy another with a cuppa tea!
Lemon & Hazelnut Biscuits
250g butter, at room temperature
1 1/2 (240g) cups icing sugar
2 tablespoons grated lemon rind
1 cup (150g) plain flour
1/2 cup (75g) self-raising flour
1/2 cup (50g) hazelnut meal
2-3 tablespoons lemon juice
20g candied lemon, to decorate (optional)
1. Preheat oven to 150°C or 130°C fan forced. Line three baking trays with baking paper.
2. Using an electric mixer, beat butter, and 1 cup of icing sugar until light and fluffy. Stir in lemon rind. Work in flours and hazelnut meal gradually, until a dough forms. Wrap in plastic wrap and chill for 1 hour.
3. Pinch off 1/2 tablespoons of dough and roll into balls. Place on prepared trays about 5cm apart and flatten slightly with palm of your hand. Chill for 20 mins.
4. Bake for 12-15 mins, or until golden brown. Set aside to cool on trays.
5. To make icing, combine remaining icing sugar with lemon juice in a small bowl until smooth. Spoon a little icing onto each biscuit and top with candied lemon if using. Set biscuits aside until icing sets. Store in an airtight container.
Makes 35.
 Voila! Bon Appétit!
Read More......

