


Recent Recipes
Chocolate Beer Cake
Comments (9) | Wednesday, March 31, 2010

Hamsley and Mum commented that they couldn't really taste the beer, but I was sure that I could. It was a nice light cupcake, mostly likely caused by the bubbles in the beer. I would make this again, I'm sure it would be a hit with men if you dragged them along to an afternoon tea!
Chocolate Beer Cake
Piklet & Pie
Get your hands on:
3 tablespoons heavy cream
3/4 teaspoon instant coffee


Read More......
Week 15 - The Cookbook Challenge: Dark Chocolate and Raspberry Muffins
Comments (24) | Saturday, February 27, 2010


I thought the Bourke Street Bakery cookbook was a bakery in Melbourne, as we also have a Bourke Street. But low and behold I was wrong, and it was actually in Sydney. When I have a trip up to Sydney, this place will be on the list of places to try.
After much debating if I actually wanted this cookbook, I put it on my Christmas list and mum popped it under the tree for me.
This is the first recipe I've made using this book. I found it a bit annoying that some ingredients were listed with cup measurements, then others in grams. I would have liked some consistency!

I'm looking forward to another one for breakfast tomorrow!
Dark Chocolate and Raspberry Muffins
Paul Allam and David McGuinness
Get your hands on:
400g (2 2/3 cups) plain flour
2 teaspoons baking powder
300g caster sugar
310g unsalted butter
480ml buttermilk
1 teaspoon vanilla extract
3 eggs
225g dark chocolate, roughly chopped
225g raspberries, fresh or frozen
55g raw (dermerara) sugar
Icing sugar, for dusting
1. Preheat the oven to 190°C (375°F). Lightly grease a 12-hole muffin tin and line with paper cases.
2. Sift the flour and baking paper into a bowl and add the sugar, mixing well to combine.
3. Melt the butter in a saucepan over low heat, then remove from the heat and stir in the buttermilk. Using a whisk stir in the eggs to combine. Pour over the dry ingredients and whisk to combine. Use a large spoon to gently fold through the chocolate and raspberries.
4. Spoon the mixture into the prepared muffin tins. Sprinkle the tops with raw sugar. Reduce the oven temperature to 180°C (350°F) and bake for 20-25 minutes. It may be necessary to drop the temperature about 10 minutes before the end of baking time if the muffins are starting to brown on top.
5. To test if the muffins are done, push the top gently to feel that it is firm. Remove from the oven and allow to cool in the tins for 10 minutes before eating. Dust with icing sugar to serve.
Makes 12.

Read More......
Gong Xi Fa Chai & Happy Valentine's Day!
Comments (16) | Sunday, February 14, 2010

There will be more posts to come involving these two events. We had 22 people at my place last night bringing in the year of the tiger, with food coming out the wazoo! I will also be cooking a romantic meal for Hamsley as I for Valentine's Day, as part of the cookbook challenge's "love" theme.

The red represents health, the gold represents prosperity.


Read More......
Week 8: The Cookbook Challenge - Dulce De Leche Cupcakes
Comments (24) | Thursday, January 7, 2010

Cookbook Used: Delicious - Quick Smart Cook


I've always wanted to taste dulce de leche since I saw Chocolate Suze make it. I should have re-read her blog entry about not piercing holes in the top of the cans, as the water gets in. But anyways, it still looks like the right consistency, and tasted pretty damn sticky and sweet.
The only thing that put me off trying this recipe earlier was that I had to leave it on the stove for 3 hours. But I was busy in the kitchen doing other things, so I was able to monitor the water level for 3 hours quite easily.

The cupcakes were very light and fluffy, and the dulce de leche iced it nicely with it's creamy, caramely goodness. The dulce de leche doesn't taste like the traditional caramel, it is more creamy and perhaps not as sweet as some sugar loaded caramels.
Our conclusions: delicious!
Dulce De Leche Cupcakes
125g unsalted butter, softened
1/2 teaspoon vanilla extract
3/4 cup (165g) caster sugar
3 eggs
2 cups (300g) self-raising flour
1/4 cup (60ml) milk
450g dulce de leche
Dulce de leche
2 x 395g cans sweetened condensed milk
1. Preheat the oven to 180°C. Grease a 12-hole muffin pan, or line with paper cases.
2. Using electric beaters, mix the butter, vanilla, sugar, eggs, flour and milk together on medium speed for 3 minutes until smooth and pale. Divide the batter among the muffin holes and bake for 25 minutes or until a skewer inserted into the centre comes out clean.
3. Cool cupcakes slightly in pan, then turn out and place on a rack to cool completely.
4. Make dulce de leche: remove and discard labels from milk cans, then make 2 small holes in the top of each with a can opener. Place in a saucepan, opened-side up, and add enough water to almost cover cans. Bring to the boil, then adjust heat to a gentle simmer and cook for 3 hours, topping up with boiling water so it stays at the same level. Using an oven glove, carefully remove cans from water. Cool completely, then open cans and scoop the thick caramel out into a container.
5. Spread the cooled cakes with dulce de leche.
Makes 12.


Read More......
Ultra-Choc Christmas Puddings
Comments (12) | Thursday, December 10, 2009


The bursts of cranberries within the puddings are a real treat, and match perfectly with the chocolately batter. They are not as heavy as a pudding would be, and look ultra cute!
I used spearmint leaves instead of fresh bay leaves, which adds a nice minty treat after eating the mini pudding.

Ultra-Choc Christmas Puddings
150g butter
100g dark chocolate, chopped
3 eggs, lightly beaten
1/3 cup (80g) sour cream
1 cup (150g) self-raising flour
1 tablespoon cocoa
1 teaspoon baking powder
3/4 cup (90g) almond meal
3/4 cup (165g) caster sugar
1/2 cup (75g) dried cranberries, plus extra to decorate
12 small fresh bay leaves (I used candy spearmint leaves instead)
Custard Icing
250g pure icing sugar, plus extra to dust
1 teaspoon custard powder
1. Preheat oven to 180°C or 160°C fan-forced. Grease a 12-hole, 1/3 cup-capacity non-stick or silicone muffin pan.
2. Melt butter and chocolate in a small saucepan on low heat, until smooth. Cool slightly. Add egg and sour cream and mix well. Sift together flour, cocoa and baking powder into a large bowl. Add almond meal, sugar and dried cranberries and mix well. Pour in chocolate mixture and stir until mixture is well combined.
3. Spoon in prepared pans, until three-quarters full. Bake for 15-20 mins, until cakes spring back when lightly touched. Cool in pan for 5 mins, then turn out onto a wire rack to cool completely.
4. Meanwhile, to make icing, sift icing sugar and custard powder into a medium bowl. Add 1-2 tablespoons of water, stirring, until thick. When puddings are cool, trim rounded tops and turn upside down onto a wire rack. Spoon over icing and press bay leaves and extra cranberries into icing. Stand until set. Dust with extra icing sugar to serve.
Makes 12.

Read More......
White Chocolate & Macadamia Cupcakes
Comments (22) | Wednesday, October 28, 2009


I adorned them with these cute buttons I picked up from Donna Hay's range at David Jones. Billy from A Table For Two asked if they were for a baby shower. They weren't on this occassion, but should one of my friends get knocked up, I'll whip up a batch for their baby shower!

185g unsalted butter, softened
3/4 cup caster sugar
1 teaspoon natural vanilla extract
3 eggs
1 cup self-raising flour
1/4 cup plain flour
125ml milk
100g white chocolate, chopped
80g macadamia nuts, chopped
ready-made icing decorations, such as buttons by Donna Hay
Royal Icing (frosting)
2 cups icing sugar, sifted
2 egg whites
1. Preheat the oven to 180°C / 160°C fan-forced. Line 12 standard muffin holes with paper cases.
2. Beat the butter, sugar and vanilla together with electric beaters until light and creamy. Add the eggs, one at a time, beating well after each addition. Sift the flours together and fold in alternately with the milk, chocolate and macadamia.
3. Divide the mixture evenly among the cases. Bake for 15 minutes, or until a skewer comes out clean when inserted into the centre of a cake. Transfer onto a wire rack to cool.
4. To make the royal icing, beat the icing sugar and eggs whites together for 5 minutes until white and glossy. Decorate each cake with the icing and little icing decorations.
Makes 12.

Read More......
Jam Doughnut Cupcakes
Comments (11) | Saturday, October 3, 2009


1 ¼ cups self-raising flour
½ cup caster sugar
125ml milk
2 eggs
1 teaspoon vanilla extract
½ teaspoon dried yeast
½ cup strawberry jam
20g unsalted butter, melted
2 tablespoons cinnamon sugar
1. Preheat the oven to 180°C / 160°C fan-forced. Line 16 standard muffin holes with paper cases.
2. Combine the flour and sugar in a bowl, and make a well in the centre. Put the milk, eggs, vanilla and yeast in a jug and whisk to combine. Pour into the well in dry ingredients and whisk until smooth.
3. Divide half the mixture evenly among the cases. Top each with 1 teaspoon of jam, then cover with the remaining mixture.
4. Bake for 10-12 minutes, or until a skewer comes out clean when inserted into the centre of the cake. Brush a little melted butter over each cake, then dip it into the cinnamon sugar. Serve cakes warm.
Makes 12-16, depending on how big your cases are.

Read More......
BeaterBlade+ & Green Tea Cupcakes
Comments (8) | Monday, August 24, 2009
You've all heard of love at first sight haven't you? I was totally in love when I first saw this product:
 Left to Right: Standard KitchenAid attachment, BeaterBlade+
I will confess, I don't actually own a KitchenAid mixer, it is technically my mother's. However I still live at home, and I swear I've used the KitchenAid far more than her. I'm just glad she is happy to share it with me! So I attached the BeaterBlade+ and was anxious to see the results:
 BeaterBlade+ attached and ready for combat
The attachment clicked in just as easy as the standard attachments. We have the sexy fire engine red KitchenAid. And you know what they say about red things, they go faster! So lets check out the difference between the standard attachment and the BeaterBlade+:
 As you can see, with the standard attachment, the mixture sticks to the sides, and doesn't mix everything together consistently. The BeaterBlade+ scrapes and mixes at the same time, so I didn't have to stop, scrape then mix, then stop, scrape and mix. It even did a fine job when I added the eggs in. This product is just the thing I have been needing my whole baking life! It cuts beating time easily by half! I will be looking forward to easier baking from now on!
You can also check out youtube footage of the attachment in action here.
The attachment is also available for the tilt head models retailing for $55.95. The lift head attachment retails for $59.95. The Fully Baked website is currently under construction, but if you would like to contact Kim about buying one, please contact me and I will supply her contact details to you.
What did I bake though? I tried green tea cupcakes, they have to be healthy if they have green tea in them right? I can only wish!
 I decided to not bake in cupcake cases for a change, but instead give my new baby bundt tin a try. The recipe states it makes 24 cupcakes, but I think they were a bit ambitious, and would probably make about 15. It also says to top with Japanese sweet red beans, but I'm afraid I don't normally stock these in my pantry, so cachous makes a reappearance.
 To be honest, couldn't really taste any green tea in these babies. Mum suggested I should try a stronger green tea, but I'm not sure which ones would be stronger. If you have any idea, please let me know! If you didn't tell anyone they were green tea flavour they wouldn't know, they would just ask you why they have a green tinge to them. They were more vanilla-y then anything, but still a nice fluffy cake. I preferred mine without the cream, not sure if I will make these again, not unless I find a stronger green tea powder.
1/2 cup milk
3 teaspoons matcha (fine green tea powder)
185g unsalted butter
3/4 cup caster sugar
1 teaspoon vanilla extract
3 eggs
1 cup self-raising flour
1/4 cup plain flour
45g Japanese sweet red beans, to decorate
Cream:
1 cup whipping cream
2 tablespoons icing sugar, sifted
1. Preheat the oven to 180°C / 160°C fan-forced. Line 24 standard muffin holes with paper cases.
2. Place the milk in a saucepan and bring just to the boil. Remove from the heat and whisk in the matcha. Allow to cool.
3. Beat the butter, sugar and vanilla together with electric beaters until light and creamy. Add the eggs, one at a time, beating well after each addition. Sift the flours together and fold in alternatively with the milk mixture. Divide the mixture evenly among the cases. Bake for 10-12 minutes, or until a skewer comes out clean when inserted into the centre of a cake. Transfer onto a wire rack to cool.
4. Beat the cream and icing sugar until stiff peaks form. Decorate each cake with cream and sweet red beans.
Makes 24.
 Voila! Bon Appétit!
Read More......
Neenish Cupcakes
Comments (11) | Wednesday, August 12, 2009
Nothing makes me happier than to see people get all excited and smile when you give them cake. Of course, the compliments that follow it don't hurt the ego either. This was certainly the case today at work when I brought in neenish cupcakes!
I'm not too sure about the chocolate half, I had to add extra milk as it was just too try to mix in the cocoa. If you make these, I'm sure you will see what I mean. But they look good, and taste pretty good too, so what more could you want?
250g unsalted butter, softened
1 cup caster sugar
1 teaspoon vanilla extract
4 eggs
1 1/2 cups self-raising flour, sifted
1/2 cup plain flour, sifted
3/4 cup milk
1/4 cup unsweetened cocoa powder, sifted
White Icing
1 1/2 ups icing sugar, sifted
10g unsalted butter
Chocolate Topping
200g dark chocolate, roughly chopped
1. Preheat the oven to 180°C / 160°C fan-forced. Line 16 standard muffin holes with paper cases.
2. Beat the butter, sugar and vanilla together with electric beaters until light and creamy. Add the eggs one at a time, beating well after each addition. Fold in the flours alternately with the milk. Divide the mixture in half and stir the cocoa through one half of the mixture until well combined. Divide the chocolate mixture evenly into half of the cases. Then divide the plain mixture into the other half, so that each case is filled with half chocolate and half plain mixtures. Bake for 18-20 minutes, or until a skewer comes out clean when inserted into the centre of the cake. Transfer onto a wire rack to cool.
3. To make the white icing, place the icing sugar and butter in a small heatproof bowl. Stir in enough warm water to form a smooth paste. Sit the bowl over a small saucepan of simmering water and stir until smooth and glossy. Remove from the heat. Spread the icing over the white side of each cake.
4. To make the chocolate topping, place the chocolate in a small bowl over a saucepan of simmering water, and stir occasionally until the chocolate has melted. Spread the chocolate over the other half of the cake.
Makes 16.
 Voila! Bon Appétit!
Read More......
Jaffa Cupcakes
Comments (9) | Thursday, August 6, 2009
So I bought this new cupcake cookbook to add to my already massive collection of cookbooks. Despite already owning quite a few cupcake books, I would have to say this one is my favorite. The pictures are gorgeous, and well the first recipe I tried was a MASSIVE success.
My parents even loved these cupcakes. Dad kept saying the cupcakes were lighter than the icing! And he wasn't lying either, these cupcakes were so unbelievable light and fluffy, the lightest cupcakes I think I've ever had!
Jaffa Cupcakes
1 1/3 cups self-raising flour
1/4 cup unsweetened cocoa powder
1 cup caster sugar
2 eggs, lightly beaten
170ml milk
125g unsalted butter, melted
1 tablespoon finely grated orange zest
Orange Buttercream Icing
2 cups icing sugar, sifted
60g unsalted butter, softened
2 teaspoons finely grated orange zest
2 tablespoons orange juice
cachous, to decorate
1. Preheat the oven to 180°C / 160°C fan-forced. Line 12 standard muffin holes with paper cases.
2. Sift the flour and cocoa into a large bowl, then stir in the sugar. Add the egg, milk, melted butter and orange zest and beat with electric beaters for 2 minutes, or until well combined and smooth.
3. Divide the mixture evenly among the cases. Bake for 18-20 minutes, or until a skewer comes out clean when inserted into the centre of the cake. Transfer onto a wire rack to cool.
4. To make the orange buttercream, place 1 cup of the icing sugar, the butter, zest and orange juice in a large mixing bowl. Beat with electric beaters until smooth and creamy. Gradually add the remaining icing sugar and beat until the cream is thick.
5. Decorate each cake with buttercream icing and cachous.
Makes 12.
 Voila! Bon Appétit!
Read More......
Caramel Easter-Egg Muffins
Comments (2) | Saturday, April 4, 2009
It's that time of year again, my favorite, Easter! Chocolate to celebrate? I dunno who thought of that but I LOVE that idea!
I was going to give hot cross buns a go but my aunty dropped around a dozen and mum bought some so I thought I'd leave that idea for another day.
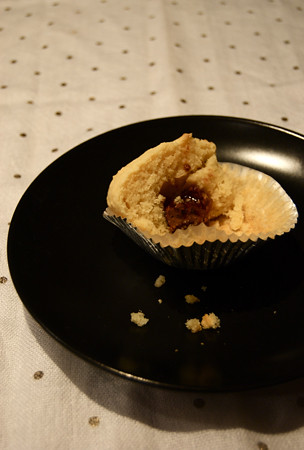
These are good even if they aren't warm. They are best after baking as the chocolate is still all soft and gooey. A nice treat for your Easter breakfast!
Caramel Easter-Egg Muffins
Taste.com.au
2 1/4 cups self-raising flour
2/3 cup caster sugar
125g butter, melted, cooled
3/4 cup milk
2 eggs
1 teaspoon vanilla essence
12 small caramel-filled Easter eggs*
1. Preheat oven to 180°C. Line a 12 x 1/3-cup capacity muffin pan with paper cases.
2. Sift flour into a large bowl. Stir in sugar. Whisk butter, milk, eggs and vanilla essence together.
3. Add butter mixture to dry ingredients. Use a wooden spoon to mix until just combined (don't over-mix or your muffins will be tough). Spoon batter into cases so each is one-third full. Place an unwrapped Easter egg into the middle of each muffin. Spoon over remaining muffin batter.
Hint: Make sure you don't eat muffins while hot as the caramel inside the eggs will be very hot. * When Easter eggs are not available, use Rolo chocolates or pieces of caramel-filled chocolate.
 Voila! Bon Appétit!
Read More......


